Vue.js VueFire Vuex

▌Introduction
I created a shopping cart sample
code with VueFire and Vuex on my Github: KarateJB/Vue.Firebase.Sample
The sample code is built by the
features and concept of Vue.js and Firebase in the tutorial series. You can
find them in the below related articles.
▋Related articles
▌Environment
▋Vue.js 2.5.11
▋Vue CLI 3.2.1
▋Firebase Javascript SDK 5.5.8
▋VueFire 1.4.5
▋Vuex 3.0.01
▌Features
▋Firebase Authentication with Google Account
The user
can login with google accounts.


▋State management
Use Vuex
to manage the amount and cost when user put the product(s) to the shopping
cart.

When
click on the Shopping cart icon, the app will shows the items in the shopping cart.

Send Order will save the order into Firebase RTDB.
▋Product management (Only for Admin in default)
Admin can
create/edit/delete the products.
Drag or
select a picture of the product to save it to Firebase Cloud Storage.

▋Messaging by FCM
Supports
FCM(Firebase Cloud
Messaging) for real-time message from Cloud Functions.

▌Get started
▋Firebase
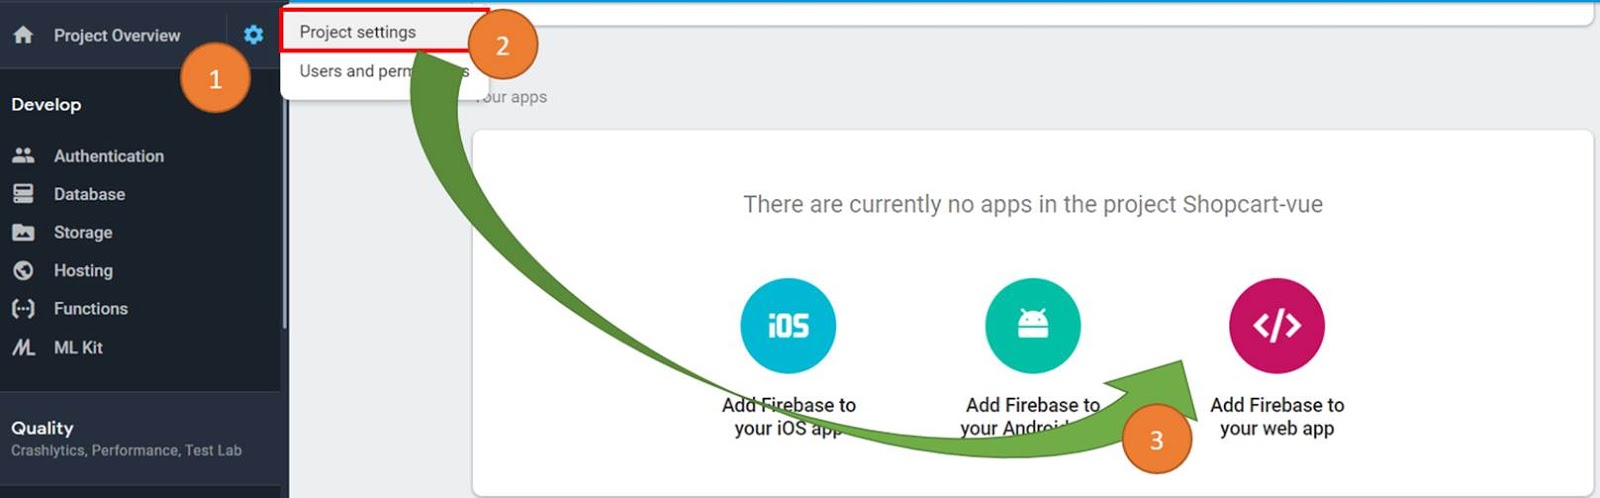
▋Create a new Firebase project
Go to Firebase Console and create a
new project.

Notice that we will use the following features of
Firebase.
1. Authentication
2. Real-time database
3. Cloud storage
4. Hosting

▋Enable Google login

▋Set RTDB rules
Copy the following default rules to RTDB rules.
{
"rules": {
"Demo": {
"products": {
".read": "auth
!= null",
".write": "auth
!= null && auth.token.email ==
'<ur-email@gmail.com>'"
},
"orders": {
".read": "auth
!= null",
".write": "auth
!= null"
}
}
}
}

▋Set Storage rules
Copy the following rules to Storage rules.
service firebase.storage {
match
/b/{bucket}/o {
match
/{allPaths=**} {
allow read:
if request.auth!=null;
allow write:
if (request.resource.size < 1 * 1024 * 1024 &&
request.auth.token.email == 'ur-email@gmail.com');
}
}
}

▋Initialize the application
▋Install dependencies
After you fork/clone the Github repository,
install the dependencies by
$ cd app
$ npm install
▋Update FirebaseConfig.ts
Back to Firebase, and copy the Firebase api config.

Rename app\src\modules\FirebaseConfig.ts to FirebaseConfig.prod.js
and paste the above configuration to it.
▋Deploy
▋Build the app (To /dist)
$ npm run build
Notice that I use copy-webpack-plugin
to copy the index.html
to dist
directory in webpack.config.prod.js.
▋Deploy to Firebase Hosting
Use Firebase CLI to deploy our application. Before
deploying, we need to initialize the metadata by…
$ firebase login
$ firebase init
The first command will guide you to login a Google
account.
The second command will guide you to initialize your
application, you can take a look at my previous article: [Angular]
Deploy to Firebase for more details.
(Dont worry, the steps for deploy Angular or Vue app
to Firebase are the same)
After initializing, now you can deploy the
application to Firebase with this command.
$ firebase deploy --only hosting
▋Use other firebase project (Optional)
If we are going to manage multiple Firebase project
in a single application, use the following command to ADD another Firebase
project’s information.
$ firebase use --add
Check all Firebase projects in this application.
$ firebase list
Or switch to the other one.
$ firebase use {alias name}
Have fun and
if there are any questions, you can create an issue on Github.
▋Sample code
沒有留言:
張貼留言