Vue.js VueFire FCM Cloud Messaging
▌Introduction
Firebase Cloud
Messaging (FCM) provides a cross-platform messaging solution that we can
send notification to client app from backend.
Firebase Cloud Functions
runs backend codes for responding the events of Firebase features or Http
requests.
In this tutorial series, we will
learn how to integrate FCM and Cloud Functions to send real-time message to
client on web application.
▋Related articles
▌Environment
▋Vue.js 2.5.11
▋Vue CLI 3.2.1
▋Firebase Javascript SDK 5.5.8
▋VueFire 1.4.5
▌Firebase
▋Firebase setup
First we
have to enable the feature of FCM on your Firebase project.

On the
top of Cloud Messaging page, we can
see
1. Server key
2. Sender ID
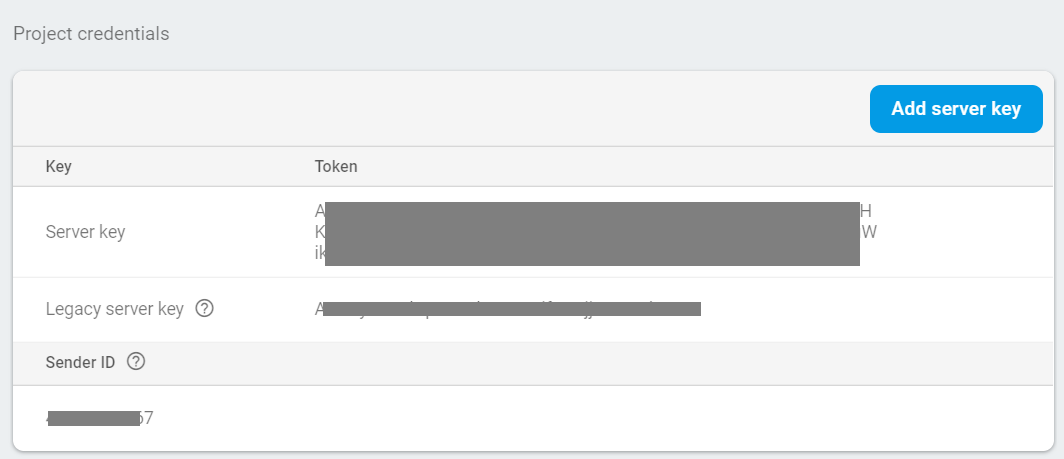
Scroll to
the bottom of Cloud Messaging page,
generate a new key.
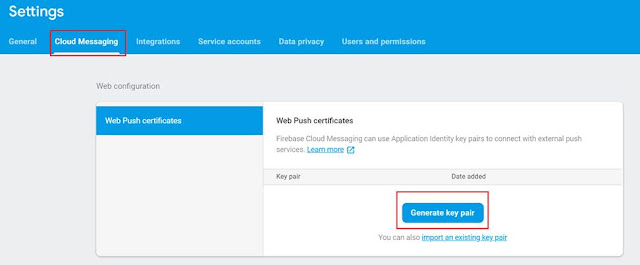

Copy the
key for later initialization of messaging instance.

Here are
what we need in the tutorial.
Name
|
Description
|
Server key
|
The authentication key for sending
FCM
|
Sender ID
|
Which is used to initialize the
service worker
|
Web Push certificate key
|
This will be the VAPID key
credential when sending message requests to different push services
|
▌Implement
▋Create web app manifest
From The Web
App Manifest:
The web app manifest is a
simple JSON file that tells the browser about your web application and how it
should behave when 'installed' on the user's mobile device or desktop.
|
Since we must let the client
app allow FCM sending message to it, copy the Sender ID
and paste it to manifest.json which should be at the app’s root path,
{
"gcm_sender_id": "<Your
Sender ID>"
}
You can create one online by Web App Manifest Generator.
Here is my simple manifest.json
for example,
{
"name": "Vue.Firebase.Sample",
"description": "Vue.js
+ Firebase sample (VueFire + Vuex)",
"version": "1.0",
"gcm_sender_id": "xxxxxxx
}
▋Initialize the Firebase messaging instance with VueFire
Import
the necessary packages and create a global variable, firebaseMessaging,
as the messaging instance.
import firebaseConfig from './modules/firebase.config'
import firebase from 'firebase/app'
import 'firebase/messaging'
const firebaseApp =
firebase.initializeApp(firebaseConfig);
window.firebaseMessaging = firebaseApp.messaging();
I created
the other JS file, messaging-service.js, to implement initializing the
messaging instance.
Here we
need the Web Push certificate key for usePublicVapidKey
function.
export default class MessagingService
{
constructor() {
this.messaging =
window.firebaseMessaging;
this.messaging.usePublicVapidKey(
"<Your
Web Push certificate key>"
);
}
}
▋Request permission
Lets add the Request permission function into MessagingService:
async
requestPermissionAsync() {
try {
await this.messaging.requestPermission();
console.log('Notification permission granted.');
} catch (e) {
console.log('Unable to get permission to notify.', err);
}
}
The method messaging.requestPermission() displays a
consent dialog like below and users can grant your app permission to receive
notifications in the browser.


If users deny the permission, the method results in an
error.
▋Retrieve/Delete the registration token
▋Retrieve token
Lets
implement a method, getTokenAsync, for retrieving the registration
token.
We also
create method, sendTokenToServerAsync, which shall send the client’s
token to backend and save it for future usage, such as sending message or
register the token to a Topic.
And keep
a Local Storage flag: “sentToServer”,
to avoid sending the token already saved in backend again.
PS. I
didn’t implement the codes of saving token. Try saving tokens to Firebase RTDB
or your backend DB.
async
getTokenAsync() {
try {
let
currentToken = await this.messaging.getToken();
if (currentToken)
{
await this.sendTokenToServerAsync(currentToken);
return
currentToken;
}
else {
console.log('No Instance ID token available. Request permission to
generate one.');
this.setTokenSentToServerFlg(false);
return false;
}
} catch (err) {
console.log('An error occurred while retrieving token. ', err);
this.setTokenSentToServerFlg(false);
return false;
}
}
async
sendTokenToServerAsync(currentToken) {
try {
if (!this.isTokenSentToServer())
{
console.log('Sending token to server...');
// TODO:
Send the current token to your server.
this.setTokenSentToServerFlg(true);
}
else {
console.log('Token already sent to server so won\'t send it again
unless it changes');
}
} catch (err) {
console.log('Unable to send token to server', err);
}
}
isTokenSentToServer()
{
return
window.localStorage.getItem('sentToServer') === '1';
}
setTokenSentToServerFlg(sent)
{
window.localStorage.setItem('sentToServer', sent ? '1' : '0');
}
▋Delete token
We can
delete a token as following,
async deleteTokenAsync() {
try {
let
currentToken = await this.messaging.getToken();
await this.messaging.deleteToken(currentToken);
this.setTokenSentToServerFlg(false);
console.log('Token deleted.');
} catch (err) {
console.log('Unable to delete token. ', err);
}
}
▋Firebase messaging service worker
To
receive the message, we need define the Firebase messaging service worker in firebase-messaging-sw.js,
and put it to the root of our web application. The Sender ID is required in this step.
▋firebase-messaging-sw.js
importScripts('https://www.gstatic.com/firebasejs/4.8.1/firebase-app.js');
importScripts('https://www.gstatic.com/firebasejs/4.8.1/firebase-messaging.js');
firebase.initializeApp({
'messagingSenderId': '<Your Sender
ID>'
});
▋Receiving Message
Now in our Vue.js app, define the event: onMessage, in order to receive the
FCM message when the web app is in the foreground.
var app = new Vue({
el: '#app',
data: {
user: null
},
methods: {
async
setFbMessaging() {
let msgService
= new messagingService();
//Request
permission
await
msgService.requestPermissionAsync();
//Retrieve
token
await msgService.getTokenAsync();
},
},
created() {
var vm = this;
vm.setFbMessaging();
//Add
callback for receiving FCM
firebaseMessaging.onMessage(function(payload) {
let
notification = payload.notification;
alert(notification.body);
});
}
};
▋Sending Message to single client
In
the end of this article, we will send message to a single client by its token
thru the FCM web api.
I
will use Postman for example and here we need the following information:
1. Server key
2. User’s registration token
The
http request for sending message:
|
Headers:
Content-Type: application/json
Authorization: key=<Your Server key>
Body:
{
"notification": {
"title": "Advertisements",
"body": "We have special discount for you, visit here
for more details!!",
"click_action": "https://yourwebsite.com"
},
"registration_ids": [
"<User1’s
token>","<User2’s token>", …
]
}
|
Notice
that you can replace "registration_ids"
: [] to "to"
: "<User’s token>" when the message is for only one
client.
▋Demo


▌Reference
沒有留言:
張貼留言