Sunday, April 22, 2018

[Vue] Component - Props and v-model


 Vue.js   v-model   sub-component  


▌Introduction


Some notes about…
1.  Props in component
2.  The way to implement passing v-model to a child-component and how it works.


▌Environment


▋vue.js 2.5.16


▌Implement


Here we are going to create a select-list component which the listed data (text and value) is from parent component. When the selected value is changed, we would like to show a message and display it on parent component.


▋About props

▋Basic usage

Vue.component('my-list', {
    props: [
        'options', //array
        'alert', //function
    ],
data: function () {
        return {
            selected: null
        };
    },
    watch: {
        selected: function (val) {
            this.alert(val.text);
        }
    },
    template: `<div>
              <select v-model="selected">
                  <option v-for="option in options" :value="option">{{ option.text }}</option>
              </select>
             </div>`
})


▋Advanced usage

Vue.component('my-list', {
    props: {
        options: { //array
            type: Array,
            required: true,
            validator: function (value) {
                return value.length == 3;
            }
        },
        //options: [Array, Object], //For multiple possible types
       alert: { //function
            type: Function,
            default: function (text) {
                alert('(Sub-component)You selected '+ text);
            }
        }
    },
    data: function () {
        return {
            selected: null
        };
    },
    watch: {
        selected: function (val) {
            this.alert(val.text);
        }
    },
    template: `<div>
              <select v-model="selected">
                  <option v-for="option in options" :value="option">{{ option.text }}</option>
              </select>
             </div>`
})

We can use Prop validation to validate the values or type of a property.

l   type: Specify the type(s) of the prop.
l   required: Check if pass a value to it is a must
l   default: Assign a default value or function to the prop
l   validator: Customize a validator


▋Use the component

<my-list :options='myOptions' :alert='myAlert'></my-list>


▋Emit an event of Parent
Now we will implement the notification of the selected-option to the parent by emitting.

Lets update the parent’s template like this,

▋Parent component

<my-list :options='movie.options' :alert='myAlert' @update-event="updateSelected"  ></my-list>

Which the updateSelected is the function from parent for updating the model of it.

Then we can emit “update-event” in child component as following.


▋Child component

watch: {
        selected: function (val) {
            this.$emit('update-event', val);
        }
    },


Furthermore we can pass a v-model to child component to make it easier.

▋Pass a v-model as prop

▋Parent component

<my-list :options='myOptions' v-model="selected"></my-list>

Notice that v-model is the syntactic sugar as following,

<my-list :options='myOptions':value="selected" @input="selected = $event"></my-list>


So we can update v-model as following in child component.

▋Child component

watch: {
        selected: function (val) {
            this.$emit('input', val);
        }
    },


▋Source code


▌Reference


Thursday, April 19, 2018

[ASP.NET] Use Hangfire to schedue caching to Redis


 Redis   HangFire  


▌Introduction


Here is an example of using Hangfire with Sql server to schedule a cache-creating to Redis.


▌Environment


▋Visual Studio 2017 community
▋ASP.NET MVC 5
▋Hangfire 1.6.19
▋Hangfire.SqlServer 1.6.19
▋StackExchange.Redis 1.2.6
▋Newtonsoft.Json 11.0.2


▌Implement


▋Install packages


▋Create database for Hangfire

First we have to create a database or use an exist one for Hangfire.
Make sure the connection string is in your WebConfig.

<connectionStrings>
   <add name="HangFire" connectionString="…." providerName="System.Data.SqlClient" />
</connectionStrings>


▋Setup HangFire

Add an OWIN Startup class into your ASP.NET MVC template.


public void Configuration(IAppBuilder app)
{
            this.setHangFire(app);
}

private void setHangFire(IAppBuilder app)
{
            var options = new SqlServerStorageOptions
            {
                QueuePollInterval = TimeSpan.FromSeconds(60), // Default value
            };

            // Hangfire: Use Sql server
            GlobalConfiguration.Configuration.UseSqlServerStorage("HangFire", options);
            // Enable HanfireServer
            app.UseHangfireServer();
            // Enable Hangfire's dashboard
            app.UseHangfireDashboard();
        }
}

1.  Job storage in Sql server uses pooling to fetch jobs.The default polling interval is 15 seconds. You can modify it by defining a custom option: SqlServerStorageOptions

2.  Notice that “HangFie” of this line is the connection string’s name in WebConfig

GlobalConfiguration.Configuration.UseSqlServerStorage("HangFire", options);

3.  (Optional) Enable the dashboard of Hangfire

app.UseHangfireDashboard();


▋Build and run to initialize

After initializing Hangfire, you can open the website like http://MyServer/hangfire
to watch the dashboard.


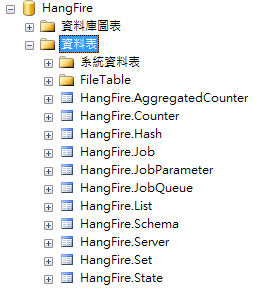
And check that the tables created automatically by Hangfire.


▋Logging

If we already have logging framework such like NLog, Log4Net, Elmah (See document),
We don’t have to do extra settings to enable logging.

However, you can still specify the logging level of Hangfire in your logging framework.

For example, in NLog.config

<rules>
    <logger name="Hangfire.*" levels="Error, Fatal" writeTo="MyFile"  />
</rules>


▋Create Redis Service class

Before scheduling a Hangfire job, lets create service class for accessing Redis.

public class CacheService
{
        private const string SERVER = "MyServer:6379";
        private readonly ConnectionMultiplexer redis = null;
        private readonly IDatabase redisDb = null;

        /// <summary>
        /// Constructor
        /// </summary>
        public CacheService()
        {
            this.redis = ConnectionMultiplexer.Connect(SERVER);
            this.redisDb = redis.GetDatabase();
        }

        public void SaveCache<T>(string key, T data)
        {
            var value = JsonConvert.SerializeObject(data);
            this.redisDb.StringSet(key, value);
        }

public bool GetCache<T>(string key, out T rtn) where T : new()
        {
            if (redisDb.KeyExists(key))
            {
                var value = this.redisDb.StringGet(key);
                rtn = JsonConvert.DeserializeObject<T>(value);
                return true;
            }
            else
            {
                rtn = new T();
                return false;
            }
        }
}


▋Fire or Schedule a Background job

//Fire a background job immediately
BackgroundJob.Enqueue(() => ()=>new CacheService().SaveCache("Emp", data));

//Schedule a cron job
RecurringJob.RemoveIfExists("CacheEmployeeId");
RecurringJob.AddOrUpdate("CacheEmployeeId", ()=>new CacheService().SaveCache("Emp", data), Cron.Daily);


Result for firing a background job immediately


Result for scheduling a cron job


▌Reference